top of page

It is Well - Kristene DiMarco
00:0000:00
Adobe Training - December 5-7, 2016


11/07/2016 - Shutter speed
Before After
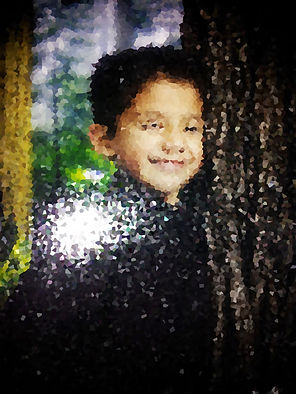
Here is the Original Photo
that had Rips all over the old picture, This was the before with many rips over the background and the face.
For this Final edit, I finished Eliminating the rips within the pictures with the heal spot brush of the face and the patch tool for major parts of the photo IE. the background. I did use a bit of blue tool on the face for a more natural look.


11/07/2016 - Shutter speed
BEFORE EDIT FINAL
For this edit, I used the Healing Brush Tool over minor wrinkles and used the patch tool over wrinkles that were too huge to fix with the brush tool.
Here is the Original Photo
that has wrinkles all over, getting ready to edit the facial features in this photo.
For this Final edit, I finished taking off the wrinkles and minor flaws on the old woman's face. Then I used Hue/Saturation to bring color to her lips and here eyes for the over all effect of the photo.
11/17/16 Relationship Between Aperture, Shutter Speed and ISO

Aperture: F/11
Shutter Speed: 1/250th of a second
ISO - 100


11/07/2016 - Shutter speed
1/800 1/250 1/60
For this option, the shutter speed allowed it to capture a fast spinning object at a quick speed and allowed it to take the picture without blur nor any noise.
For this option, the shutter speed allowed it to capture a Semi fast spinning object at a quick speed and allowed it to take the picture with some blur.
For this option, the shutter speed allowed it to capture a fast spinning object at a slow speed and allowed it to take the picture with blur.


10/10/16 - Digital Color Correcting
On photoshop, I just selected certain parts of this picture and created a mask for the sky, the face, the grass, and the uniform. I added a color overlay over the masks and made it a darkish color to make it look realistic. While I selected the masks I used refine edge to make the edges of the selection more smoother and for the colors to come out more evenly throught the photo.

10/05/16 - Real World Photography Projects
10/05/16 - My Name - Photographic Art

10/10/16 - Name photography
On photoshop I first pasted all the different photos that I've taken, then I cropped some of the photos and I've placed them side by side together. I them made it black and white and saved it as a JPG file. I took the " A " when I was eating pizza, when I took the " b " it was when I went on a road trip to south Dekota, the R is a rail I was passing by while walking through national city, the other "a" was from a sign at chick-fil-a, the "h" is a chair from my cousins house, and the "M" is from Mc donalds.


09/15/16- Digital Photogram Design
For this photo edit, I first went on photoshop then used a black white filter. Then I used the chalk & charcoal filter and adjusted the levels of black and white on this filter. I also used a change of level of exposures, black and white adjustment, etc.
09/14/16- Tells a Story or Expresses Mood Images
 |  |  |
|---|---|---|
 |  |
09/13/16- Scale & Perspective
For these pictures, I zoomed out with my camera and had composition in many of these photos. The perspective did change with some of these picture as well like the hand on the tree and comparing a small object to a big object as seen.


Before | After
On Photoshop, I first cropped the picture to fit the rule of thirds and to fix the composure in the front pic and back. Then used brightness and contrast on the picture to make the person light up brighter, while making the background a bit darker. Then used the exposure feature to correct the exposure in the picture above and to balance it. Then I used smart sharped to sharpen the picture more.


09/08/16- Symmetrical | Asymmetrical | Radial Balance


08/31/16- Rule of Thirds Applied
Before Applying Rule of Thirds
On my original photo, I'm in the middle shot and so the rule of thirds isn't really applied at the moment.
After applying rule of Thirds
I'm no longer in the middle and i've set some room to the side of the picture. the rule of thirds is now greatly applied
After applying rule of thirds
I've decided that i would crop a bit of the lockers to provide a less irritating pattern and to make myself move a bit to the right of the picture with the crop tool, having a balance between the background and i.


Before | After
On photoshop, I first edited a bit of the contrast and the brightness. Then I just used the hue/saturation tool and made the saturation -100 to make a black and white effect over the picture. Then I saved as jpeg.
 |  | |
|---|---|---|
|  |
08/30/16- Portrait Images & Studio Photography
08/29/16- Portrait: Studio Photography
Fig. 5-2:
The emotional effect is very dull, yet peaceful and smooth.
Fig. 5-3:
There seems to be a clean slate on the counter tops while the floor is flooded with powder. The pan he is holding seems heavy, but clean so he looks like an organized, straight-forward man, taking seriously what he does.
Fig. 5-4:
It leaves some room for the background, but leaves a focus on her appearance for the viewer of the photo
Fig. 5-5:
He uses light to convey a freeness in the way the light faces his face.
8/12 My Favorite Elements GIF Animation
On photoshop, I took a photo and used the same photo four times. I manipulted it using the "Filters" tab then I used "Blur/ Motion Blur" then on the other photo I used "Pixilate/ Crystalize"And on the last photo I used "Distort" to make this Gif combination. Then I placed them together in a film animation then saved as web.
 |  |  |
|---|---|---|
 |  |
08/12/16- My Favorite Elements


Before | After
I edited this photo to just make it look better instead of a mystical aspect. I first used Smart shapen on the filters tab/Sharpen, then I used exposure and contranst and increased the brightness and contrast. After that, I used Hue & Saturation to make the colors look less faded and to pop out more as seen above. =)
 |  |  |
|---|---|---|
 |  |  |
08/11/16- My Vision in Elements of Art


Before | After
What I did on photoshop was increase the contrast on the photo and lower the brightness. Then I used lighting effects under filter/render/Lighting effects to adjust some of the lighting. then I sharpened the photo a bit using smart sharpen under filter/sharpen/smart sharpen
 |  |  |
|---|---|---|
 |  |
08/10/16- Camera Angles
Recreation Mimic Before | After

Before | After
On photoshop I first adjusted the brightness/contrast a tad bit, then I just added a filter and crystalized it by a little bit. Then I flipped the photo vertically.
 |  |  |
|---|---|---|
 |
08/08/16- Photo Recreation Baby Pictures
Photo Critique #1


Before | After
I increased the saturation on the flower and increased the constrast. Then I sharpened the photo a little bit using the filer/smart filer. Then I just edited the hue master on the hue/saturation feature on photoshop. =)
08/05/2016- Medium-Close-up & Extreme Close-Up
 |  |
|---|---|
 |  |
 |


Before | After
On photoshop I first edited the exposure to brighten up the photo. Then I used curves to balance the dark and brightness. I masked the sky to lower the brightness compared to how it was when I edited photo as a whole after that I edited brightness & Contrast.
 |  |  |
|---|---|---|
 |  |
08/02/2016 - Landscape


8/1 | Photo Manipulation Edit
Before After
I used photoshop to manipulate this image. While using photoshop, I lowered the brightness using the brightness and contrast feature. Then I masked the sky and pasted a stary sky to replace it. I then used the lighting effects under the filter tab. After that, I used color balance on the skin to make it less red, helping it get a more natural color in the photo.

Band Camp 2016
Eating during Band Camp at Bonita Vista High School

Band Camp 2016
Lunch break for Band Camp in Bonita Vista High School

Band Camp 2016
Lunch break for Band Camp in Bonita Vista High School
Band Camp 2016
Eating during Band Camp at Bonita Vista High School
1/10
7/28 - Documentary Photos

07/29/16- Self Evaluation
I would rate my website a 7/10. Mostly because its not fully complete assignments wise, but is pretty modern looking. I have all the required headings and pages, but I need to update regularly and to just stay updated with all the needs of the website. Overall, I believe it's pretty good, but I just need to work on updating the website everyday and be more diligent on this website.

BEFORE | AFTER FOR WEEKEND PICS
First I sharpened my photoshop using smart sharpen under filter/sharpen/smart sharpen. then I used lighting effects to target the object and lowered the brightness. after that, I added brush effects to create a mystical effect by downloading brushes and loading them on photoshop.
 MORE PPL yeet |
|---|
 Church PPL |
 Worship Team |
 MORE PPL YEY |
 More PPL |
07/28/2016 - Weekend Pics
7/27 - *Animoto Video*


7/26 -
Photo Manipulation
Before After
I made the photo black and white
through the filters tab. Then I added light rendering from the filters tab, render, Lighting Effects. Then I selected the main figures on the pictures and added an outer glow to the photos. My skills on photoshop from 1 to 10 would be 6.
 |  |  |
|---|---|---|
 |  |
7/26 - five photos
 |  |  |
|---|---|---|
 | |
7/25 - five photos
![Big_yellow_flower-Recovered[1]](https://static.wixstatic.com/media/57eec5_68827e3b03984f1f914c69fb6db25ecb~mv2_d_3264_3264_s_4_2.jpg/v1/fill/w_250,h_250,al_c,q_90,enc_auto/57eec5_68827e3b03984f1f914c69fb6db25ecb~mv2_d_3264_3264_s_4_2.jpg) | ![Desert_Plant[1]](https://static.wixstatic.com/media/57eec5_96baa5d6de154ac8abdfeb697e3ebfe2~mv2_d_4928_3264_s_4_2.png/v1/fill/w_250,h_165,al_c,q_95,enc_auto/57eec5_96baa5d6de154ac8abdfeb697e3ebfe2~mv2_d_4928_3264_s_4_2.png) |  |
|---|---|---|
 |  |
7/22 - five photos
bottom of page